

Announcements
-
Similar Content
-
-
Latest Posts
-

-
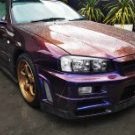
 1994 Series 3 R32 GTR. Freshly built as the perfect weekender. Has many brand new Nissan OEM pieces (some you can no longer source). Last serviced (April 2024) at V Spec Performance, Melbourne, Australia. Feel free to DM me if any questions. Asking price: $190,000 AUD. Engine RB26DETT Original 05U block Factory R32 crankshaft CP 86.5mm forged pistons Spool forged rods Factory cylinder head – rebuilt Factory valve train Factory camshafts Factory inlet manifold Factory throttle body Garrett dash -5 turbos Custom intercooler piping with Plazmaman clamps Plazamaman 100mm race intercooler Turbosmart BOV Tomei fuel rail 660cc injectors Goodridge 9000 series fuel lines with crimped fittings Stainless steel front pipes Tomei titanium exhaust with stainless steel cat converter Spit fire coils Powder coated rocket covers New Nissan coil pack emblem badge Fully repainted engine bay in Factory Black Refurbished ABS unit New Nissan brake master cylinder New Nissan brake lines New Nissan clutch master cylinder New Nissan washer bottles Custom catch can (powder coated with Goodridge lines) Steering rack rebuilt New Nissan power steering lines New Nissan AC lines A/C compressor refurbished AC condenser refurbished HPI radiator and new thermos fanes New radiator fans NOTE: All nuts, bolts, fixings new or zinc coated Driveline Factory 5 speed gear box rebuilt Xtreme twin plate clutch Stainless steel clutch line Rebuilt factory transfer case Custom one-piece tail shaft Rebuilt factory front diff Rebuilt factory rear diff Suspension HICAS deleted Bilstein dampers IKEYA formular front and rear arms and tie rod ends New bushes wherever possible Whiteline anti roll bars (underneath car only) Brakes Brembo F50 front callipers – 4 piston AP racing 380*32 front rotors, J Hook design Custom floating hat and calliper mounts Brembo 4 piston rear callipers PFC pads Stainless steel braided brake lines Body New Factory Black paint job Ceramic coated exterior panels New Nissan aluminium bonnet (super rare) New Nissan headlights (super rare) New Nissan indicators New Nissan front bar New Nissan front lower lip New Nissan head light and bonnet seals New Nissan windscreen cowling New Nissan wiper arms and wiper blades New aftermarket windscreen New Nissan windscreen seal New Nissan front doors window surrounds and seals New Nissan rear quarter windows (must replace for proper paint job) New Nissan rear window surrounds and seals New Nissan side skirts New Nissan boot badges New Nismo rear bonnet lip New Nissan guard liners Interior New Nissan lens cover over cluster New Nissan gear boot shift New Nissan gear knob New Nismo steering wheel New Nismo floor mats New Billet Handbrake lever New Nissan OEM pocket facia to replace radio Underbody Original stone guard removed and new stone guard coating applied Powder coated front and rear cross members Fuel lines painted to match factory colours Fuel tank removed, cleaned, repainted and refitted All nuts and fixings cleaned, repaired and zinc plated Wheels Rays/Volk racing TE37 18 x 10.5 + 15 in Bronze Yokahama A050 265 x 35 x 18
 -
 @Supernanoyour car has ended up in my hands and I was wondering if there has been any work done to the motor?
 -

By Dose Pipe Sutututu · Posted
Sigh... yeah OEM mount rear battery, very R33, very demure, very mindful. -
 Would need a substantial current draw in the car to make a bunch of sparks. Obvs to now test resistance to ground of the car's B+ lead. If there's a short there, you'll see it. Only likely place for that, as you suspect is alternator. But there is also the possibility that rats have had a chew on some insulation. Shitbox has the battery in the boot, yeah? Plenty of cable to attack.
-


Recommended Posts
Create an account or sign in to comment
You need to be a member in order to leave a comment
Create an account
Sign up for a new account in our community. It's easy!
Register a new accountSign in
Already have an account? Sign in here.
Sign In Now